Chapter 1:
Introduction

In the last lesson, we wrote an application using the features of Java lists to display information about list entries. At the end of the lesson, we used an iterator to set our position in the list so that we'll be able to move around in it.

In this lesson, we'll complete that application. Using the iterator we created, we're going to set up movement in the list so we can change the player we're looking at using either the menus or their keyboard shortcuts.

Then we're going to add a second view that loads all the list entries into a scrolling text box. While we're doing that, we'll see another way to process list entries and load the information.

After we finish our program, we'll start our discussion on what we can do with other collection types in Java. We'll talk about sorted lists today and create a sorted list of our players.

We'll examine even more Java collections in our next lesson.

Chapter 2:
Types of Collections

When we left our application in Lesson 10, we had already created the Next menu item in the View menu and a placeholder listener for it, NextMenuItemListener, that doesn't do anything yet. The code that makes the Next menu item work goes into the actionPerformed() method of its listener. We want this option to move us forward one position in our list and display the information about the next player in the screen's text fields.

If we think about moving in the list, though, there are three situations that can prevent our program from displaying the next player. Can you think of them? Don't worry if you can't come up with all three. I couldn't, either, until I ran the program a few times and realized there was one situation I'd missed! (I crashed my program, too, but at least I found it before you did. I hate it when that happens!)

The first situation I thought of that would prevent us from seeing the next player was if we'd already reached the end of the list. Moving through the list, we've displayed our players until we've seen them all and there are no more to see. So that's one possibility we'll have to allow for.

The second one was this: What if users click the Next option before they've opened a file and loaded a list? That would cause an error because we don't actually create a list until our user opens a file. We'll need to allow for that, too.

The third one was this: What if we have a list, but no players in it? (That's the one I forgot!) If a user opens an empty file, our program will create a list to hold the players, but there won't be any players in it. That's the third condition we'll have to deal with.

One additional word of warning: If we try to get a list element when there isn't one, it's like going past the end of the list. Java throws an exception that causes the program to crash unless we catch it. By using the iterator's hasNext() method, though, we can avoid the situation.

If we check for those three conditions and don't find them, we'll know we have a list with an element for us to get, so we'll get it and display it. Here's the code to do that:

    private class NextMenuItemListener implements ActionListener
{
    public void actionPerformed(ActionEvent ae)
    {
        if (list == null || list.size() == 0)
            return;
	

if (!isForward) { lit.next(); isForward = true; } if (lit.hasNext()) { Player p = lit.next(); getPlayer(p); } else { JOptionPane.showMessageDialog(frame, "There are no more players.\nYou have reached the end of the list.", "End of List", JOptionPane.WARNING_MESSAGE); } } }

The first if statement takes care of our first two error conditions. If we don't have a list yet, or if we have an empty list, we have nothing to display, so we just return from the listener.

The next if statement checks one other condition—one that's not an error, but one we need to clear up a little. Remember when we first looked at iterators and you learned that if we reverse directions with the iterator, we'll get the same list entry we got last time? In order to prevent us from seeing the same player twice when we change directions, this if statement checks the direction our iterator last moved. If it was backward and we're now moving forward, we do one extra read to get past the list element we just processed, and we also reset our direction to forward. To manage that, we need a Boolean variable to keep track of our direction, so we'll add one more declaration to our instance variables:

    private boolean isForward;


And we'll add one more statement at the end of our OpenMenuItemListener's actionPerformed() method:

    isForward = true;


Finally, the last if statement in the NextMenuItemListener's code checks to see if we have another element in our list. If we do, we can get it and display it using getPlayer(). If not, we're trying to move forward past the end of the list, so we'll pop up a warning dialog to tell our user.

If you run the program now and open the player file, you should be able to move forward through the list until you hit the end of it. If not, let me know and we'll figure out why.

Moving Backward Through the List

To allow us to move backward through the list, we need to change the PrevMenuItemListener in ways similar to what we just did to the NextMenuItemListener. The code is almost identical, but we need to reverse some conditions. I'd like you to try changing that method on your own, and let me know if you have questions. If you need to look at my code for reassurance, you can find it at the link below, but try to make the changes yourself first.

PrevMenuItemListener code

Changing Views

Now that we can move through our list, let's talk about our views. The cleanest way to have multiple views in a window is a technique we've all seen at one time or another as users of an application: tabbed panes. Almost as long as GUIs have been in use, there has been the need to display more data than will fit in a window or to display multiple groups of data that don't necessarily fit together. Tabbed panes have filled that need.

Here's a picture of our window with two tabs at the top, just below the menus, that will allow us to switch between the Player View and the Team View.

Lists window with tabs showing Player View

Lists window with tabs showing Player View

Java gives us the option of putting the tabs on any edge we want (top, bottom, left, or right), but the default position is at the top of the pane.

If we click the Team View tab or use the ALT + T key combination, the view will switch to the other tab, and this is what we'll see:

Lists window with tabs showing Team View

Lists window with tabs showing Team View

To make the tabbed panes, we'll have to make several changes to our makeContent() method. First, we'll add a tabbed pane object using the JTabbedPane class. Then we'll add two tabs to it, one that contains a panel with our Player View, and one that contains a panel with our Team View. That means we'll need to build each view in a panel instead of directly in the content pane.

That doesn't sound too bad, does it?
Let's get started.

Chapter 3:
A Tabbed Pane

The first change we make will be near the start of makeContent(), right after the two statements that set up the content pane's layout and border. We'll add a declaration for a JTabbedPane object, like this:

    JTabbedPane tabby = new JTabbedPane();


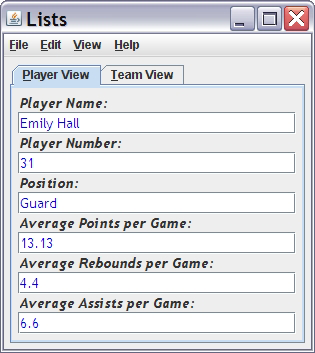
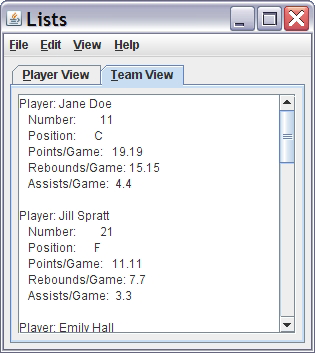
TQA-32 --- This statement creates the tabbed windowpane. At this point, it has no tabs and no GUI components to display. We can add as many tabs to it as we want, but we'll only need two. We'll name them "Player View" and "Team View." The Player View tab will show us all the information about a single player, just like we set up in Lesson 10. The Team View will show us a scrollable list of all the players and their statistics.

Each tab can display a single component. Since the Player View tab has a sequence of labels and text fields to display, we'll need to define a panel to contain them and then add the panel to the tab. The Team View tab will only display a single component, the scroll area. But just to keep our look-and-feel consistent, we'll still put it in a panel with a border so that it will look similar to the Player View.

Let's create our panel and its layout and border, just like we have a number of times before:

    JPanel panel = new JPanel();
panel.setLayout(new BoxLayout(panel, BoxLayout.Y_AXIS));
panel.setBorder(BorderFactory.createEmptyBorder(6,6,6,6));


The next step is to change all the Player View components so that we add them to the panel instead of to the content pane. Here's the first one as an example; then I'll leave the rest to you. The only change to our code is that in the third and seventh lines, we replace the variable contentPane with panel.

    nameLabel = new JLabel("Player Name:");
nameLabel.setFont(new Font("Trebuchet MS",Font.BOLD + Font.ITALIC,14));
panel.add(nameLabel);
playerName = new JTextField();
playerName.setFont(new Font("Trebuchet MS",Font.PLAIN,14));
playerName.setForeground(Color.BLUE);
panel.add(playerName);


Once the panel is ready, we create a tab in the tabbed pane to hold the panel. At the same time, we'll create a mnemonic key so we can switch tabs with the keyboard as well as with the mouse:

    tabby.addTab("Player View", panel);
tabby.setMnemonicAt(0, KeyEvent.VK_P);


The first line does two things: It adds a tab to our tabbed pane with the text Player View in it, and it puts our panel with its components in the body of the tab. The second line creates the key combination ALT + P as a keyboard mnemonic for the tab. The first argument in the setMnemonic() call, the number zero, indicates the tab we want. For this method, the tabs are referenced by the number of their position, and the first tab is in position zero. The second tab will be in position one, and so on. (By default, the addTab() method sets up the tabs from left to right in the order we create them. We can change that default sequence by using the insertTab() method instead of addTab(), but we don't have any need to do that in this lesson.)

Now we have one tab with the Player View. We're ready to set up the panel for the second view and add its tab. Since we're done with the first panel, we can reuse the variable that referred to it and create our second panel, its layout, and its border like this:

    panel = new JPanel();
panel.setLayout(new BoxLayout(panel, BoxLayout.Y_AXIS));
panel.setBorder(BorderFactory.createEmptyBorder(6,6,6,6));


The last steps are all steps that we've done before. Here's what we'll do to create the second tab:

    textArea = new JTextArea(15,25);
scrollArea = new JScrollPane(textArea);
scrollArea.setVerticalScrollBarPolicy(
        ScrollPaneConstants.VERTICAL_SCROLLBAR_AS_NEEDED);
scrollArea.setHorizontalScrollBarPolicy(
        ScrollPaneConstants.HORIZONTAL_SCROLLBAR_NEVER);
panel.add(scrollArea);
        
tabby.addTab("Team View", panel);
tabby.setMnemonicAt(1, KeyEvent.VK_T);


The first four lines set up a text area with scroll bars, like we built in Lesson 6. The fifth line adds it to the panel. The sixth line creates the tab to display the panel, with the title Team View in the tab. The last line sets the keyboard mnemonic for the tab as ALT + T.

We now have a tabbed pane with two tabs that contain the two views we want to see. All we need to do now is add the tabbed pane to our content pane, like this:

    contentPane.add(tabby);


The program should now display both tabs and let you switch between them using either the mouse or the keyboard mnemonics. Please let me know in the Discussion Area if you have trouble making it work.

Creating Data for the Team View

We have a Team View tab! But if you've tried to use it, you've probably noticed that there's no data in it. So as our last task in this part of the lesson, let's create the data display for the Team View tab and add it to the text area.

Where should we put the code? If you think about it, shouldn't it be in the same place where we add the data to the text fields in the Player View? The list first gets its data in the file open process we wrote for the actionPerformed() method in the OpenMenuItemListener inner class.

We'll add the code for the Team View data at the end of that method, and I think you'll be pleased by how easy it is. We've already set all the groundwork in the Player class. If you remember, the Player class has a toString() method in it that we used when we wanted to display a player's information. All we have to do now is get each player in the list and use its toString() method to add its information to our output.

The best part is that since we want to process every element of the list without saving our place in it, we can use Java's for-each loop. As we talked about in Lesson 2, the for-each loop processes a collection by running the code in the loop once for each element of the collection. This is what it looks like:

    for (Player p : list)
{
    textArea.setText(textArea.getText() + p.toString() + "\n\n");
}


Pretty slick, isn't it? That's all we need to get each player and add her information to the scrolling text area.

Since it might be a little fuzzy in your memory, let me explain the format of the for-each loop and what it is doing for us. The for keyword tells Java we are setting up a loop. The parentheses contain the control information for the loop. First, we tell Java the type of object we want to process (Player), and then we give Java a variable name to use (p) when giving us the elements of the collection (list). So, in short, the first line tells Java to run the loop for every Player object in the collection list and to give us the Player object in the local variable named p.

This loop format is much simpler than the iterator process we used earlier, but each has its place. This loop format only works when we want to process all the collection elements at once. We can't do part of it now and part of it later like we can with an iterator. The for-each loop also only goes one way. We can't move backward, only forward. Finally, the for-each loop does not allow replacements or deletions during the loop process. We can't replace or delete any collection elements in the loop, or the loop's actions become unpredictable. Even though using an iterator is a little more work, it's necessary because iterators allow many actions that for-each loops don't.

Having said that, the for-each loop works perfectly in the situation we have here, so we'll keep it!
The one line of code inside the loop retrieves the current text from the text area using the getText() method, adds the current player's formatted output string to it, then puts the updated text string back into the text area using the setText() method.

Once the loop finishes, the scrollable Team View is ready to display. Since that's all we need to do for the Team View, we're done with this version of the application! We can load a player file into the list collection we created for it and display the player information in both views. We can switch between the views by clicking the tabs. And in the Player View, we can move through the list using the Next and Previous menu items. Be sure to let me know in the Discussion Area if you have any problems making it all work.

I haven't given you the complete program code since the last lesson, so I'm including it here in case you would like to look at my version of it.

Tabbed Pane Program

Chapter 4:
Sorted Lists

In Lesson 10, we discussed several types of collections often used in computer applications. In the rest of this lesson, we'll look at how we can use some of these collections. The first one we'll check out is the sorted list. It's not much different from the list, with one exception, as its name indicates: The objects we put into the list are stored in sequence, however we define the sequence.

Let me explain that last statement. Think about the application we just built, which displays basketball player information. In order to sort the players, Java has to be able to compare two players and decide which is "less than" or "greater than" the other so it can decide which one goes into the list first.

That said, you would have a problem if I asked you to sort the player list, wouldn't you? Your first question would be, "How do you want it sorted? By name? By number? By points per game?" In order to sort it, Java needs a way to compare the items in it.

Well, never fear: Java gives us a way to do that in its Comparable interface. If we want to sort players, we just have to implement Comparable in the Player class, which is pretty simple. We only need to make two changes to the class.

First, we'll add the phrase "implements Comparable<Player>" to the first line of the Player class. That phrase does two things for us:

  1. It tells the compiler what type of objects we will compare. You may think that goes without saying, but with computers, we have to be explicit. The object type goes inside angle brackets at the end of the line. In our case, we want to compare Players to other Players.
  2. It allows the compiler to make sure that the class actually implements all the methods required by the interface. In this case, there is only one method to implement: compareTo().

Second, we'll add the compareTo() method to the Player class. There are two requirements for the method:

  1. There must be one parameter whose type matches the type we specified in the implements phrase at the top of the class.
  2. The method must return an int value, calculated like this:

    • If this object is less than the object received in the parameter (by whatever method we decide to use to determine that), the method must return a value less than zero.
    • If this object is equal to the object received in the parameter, the method must return zero.
    • If this object is greater than the object received in the parameter, the method must return a value greater than zero.

Here's what the additions look like for a list sorted by player number:


    public class Player implements Comparable<Player>
{
 . . .
    public int compareTo(Player p)
    {
        if (number > p.number)
            return 1;
        else if (number < p.number)
            return -1;
        else
            return 0;
    }
}


If we wanted to sort by some other criteria, like player name or points per game, we just need to change the comparisons in the compareTo() method.

Once we've made the Player class comparable, using a sorted list in our application is easy! All we have to do is add one line to our program. We'll add it to our OpenMenuItemListener inner class, where we open the file and build the list in the first place. Right after we build the list, but before we create the iterator, we'll add this line:

    Collections.sort(list);


TQA-33 --- In case you're wondering what the Collections class is, it's a very useful class. It contains a number of methods that operate on collections, including the sort() method we used above. For example, it offers a reverse() method that reverses the order of a list, min() and max() methods that find the smallest and largest elements in a collection (if the elements are comparable), a copy() method that makes a complete copy of a list, and more. If you're curious, you can check it out in the Java API.

If you're not sure where to put the last line of code we talked about, you can look at an updated version of the class by clicking this link:

Updated OpenMenuItemListener Class

Chapter 5:
Summary

We've accomplished a lot today! We've added several functions to our program. We can move forward and backward through our list now, display two views in tabs, and sort our list.

Next time, we'll see what we can do with more of Java's collections before we wrap things up. It's hard to believe there's only one more lesson to go!

I'll see you next time for Lesson 12.


Lesson 11 FAQs

Q: Besides using tabbed panes, are there other ways to display different views in Java?

A: Yes, there are several ways to display multiple views. The most straightforward approach, sometimes called a brute force method, is to just erase what's on the screen and put the new view in its place. Another way is to split the window and display side-by-side or top-and-bottom panes with different views in each pane. The tabbed approach is more efficient than the brute force method, though, and it gives each view more space to work with than the split screen does.


Q: Is there any way to support sorted lists without having to resort them every time I want to make sure the elements are in order?

A: There is another way to maintain a list so that it's always sorted. To do that, you need to use a TreeSet class instead of the ArrayList class to store the elements. Whenever we add a new element to a TreeSet, the class makes sure things stay in order at all times. That takes more overhead for inserts and deletes than with a regular list, but the list is always sorted. If you are doing a lot of inserts and deletes, it's probably more efficient to stay with the ArrayList and sort it when necessary. If you're only doing a few adds or deletes, the TreeSet may be more efficient.

There are two reasons I used the ArrayList and the Collections.sort() method in our application. First, the TreeSet class does not support the ListIterator. It only works with the standard Iterator class, which only allows one-way movement through the collection. With a TreeSet, we would be able to move forward through the list, but not backward.

The second reason is that we are only adding elements to the list once, so we only need to sort them once. Since that is the case, the ArrayList and sort() method worked most efficiently.

Lesson 11 Assignment

For this lesson's assignment, take the finished program from the lesson and add one more feature to it. I have two features in mind; pick one of them or come up with another one of your own. I thought of an update feature and a search feature.

The update feature should be under its own menu item, the Save As . . . menu option. When selected, it should write the list to the chosen file using the JFileChooser's showSaveDialog() method. That means that every time the user moves within the list, any changes made on the screen need to be saved in the list. You can change a list entry using the iterator's set() method, which replaces the last element that the iterator gave us with the entry we give it.

The search feature should also have a menu item to start it. When a user selects this menu item, an input dialog should pop up to ask for a player number, then search the list for that number. If it finds it, the program should display the player with that number. If it does not find it, another dialog should pop up to tell the user that the player was not found.

Let me know if you have any questions about the assignment.

Updated Tabs Class

Lesson 11 Quiz Answers

1. What happens if you get to the end of a list using an iterator and you try to access another list element?
Java will throw an exception.

2. Which of the following list movements do ListIterators allow?
Both forward and backward movement in the list.

3. What is the maximum number of tabs a tabbed pane can have?
There's no fixed limit.

4. How does Java know how to sort objects we define?
It sorts them according to the Comparable interface that we implement for the objects we want to sort.

5. What does Java's for-each loop do?
It repeats its logic for each element in a collection.


Lesson 11 Supplementary Materials